PS- This is not an 'original' idea of mine. I had been researching "Ikea Rast hacks" for a while and kind of combined a couple of different ideas to come up with what I did. This Honey & Fitz dresser was what made me finally decide to go with pink and gold, and this Marcus Design hack made me realize I could get the same effect of the o'verlays without having to shell out $60 by creating a simple stencil.
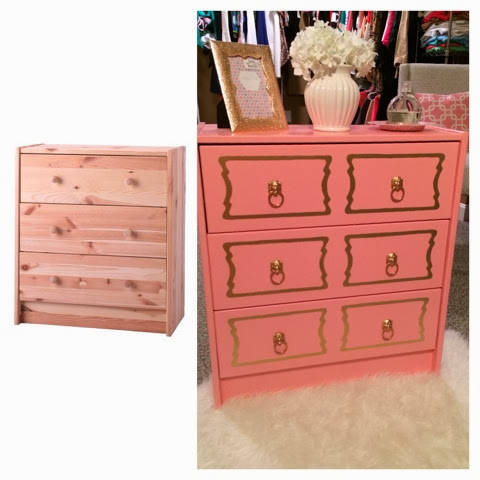
To start out, I bought the Ikea Rast dresser for $35 while I was up in Cincinnati visiting my mom and sister. Ikea has so many things that are plain and leave room for creativity and customization, and I love that about them. Plus, their stores are like my HEAVEN (enter angel noises..)
Next, I had to find the hardware. The simple brass pulls that most of the tutorials used were just kind of expensive. Since the dresser itself was only $35 and I didn't really know if it was going to turn out amazing, I didn't really want to spend a heck of a lot on 6 dresser pulls. So I found an alternative, see the lion pulls from Home Depot for $1.89 apiece below.
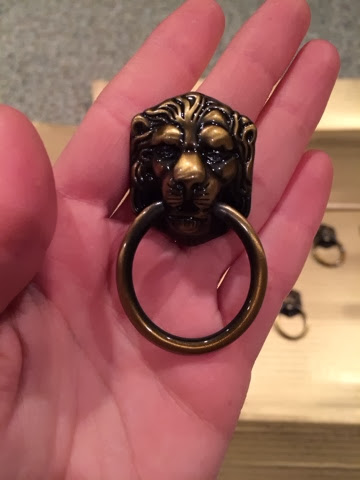
I wasn't crazy about the coloring - the blackish bronze was really just kind of ugly, but I knew I could fix it. I picked up some liquid gold leaf and a gold leaf pen - both from Michael's. I read good things about both products, and was able to use coupons- so they were both under $6. I used the liquid gold leaf to paint the drawer handles gold.


The process was really simple! And after one quick coat, (this stuff dries fast!) they looked like the above. I went ahead and did about 3 coats on each, mainly because it dried so fast and because it was really simple. I probably could have gotten away with just two. After I painted my knobs, I am not going to lie- this project was on a hiatus. I could never seem to find the time to build the dresser and start the painting/priming process. Plus it's just been such a cold winter - it's made me not want to do ANYTHING.
Finally, last weekend there was a random 60 degree, sunny day. And I realized - this is my chance to knock this out. I went home and built the shell of the dresser and put the drawers together. I then did a very light coat of a "2x the strength" primer. Some of the tutorials I read said you have to use a primer because you are starting with raw wood, and then others did not. So I kind of landed in the middle and did one light coat of a primer.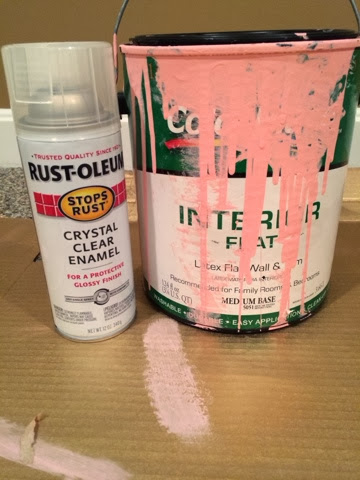
As for the pink paint - I had this paint left over from an accent wall I previously did in my last apartment. This is just "Colorplace" flat interior wall paint in a coralish-pink color. I have no idea what the name is. Colorplace paint is actually sold at WalMart - and it's amazing. It's like $11 for a gallon and it really is GOOD paint. It covers well and they will make any color you want.
*Recommendation- I used flat paint only because that's what I had on hand. If you are buying paint specifically for this project, I would get something with a gloss to it. I quickly realized I didn't love the chalky finish and I had to go back to the store to get something to put a glaze on mine.

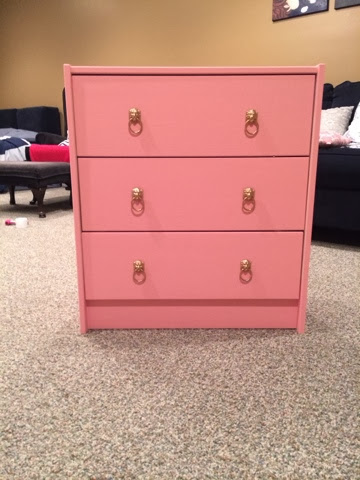
I bought one of those small foam rollers for like $4 or $5 at WalMart and used that to roll on the pink on the body and the drawers of the dresser. It took me 3-4 solid coats to get the color to be as opaque as I wanted it to be. When I wrapped up that day, I had the product below. (I was so excited with how cute it was turning out, I decided to put on the lion pulls to take a picture to send out to my friends and family. I took them back off when I started working on it again.)
As I mentioned in my recommendation above, I then decided I wasn't crazy about the look of the flat paint on the dresser. I went back to the store to get something to put a glossy finish on top of the paint. At first, I thought I would do a layer of polycrylic. Turns out- polycrylic is like $20 for a small little can. I thought that was ridiculous, so I decided on the crystal clear enamel spray paint from Rustoleum. It said it was great for sealing and producing a glossy finish, which is exactly what I wanted. And it was less than $4 for the can.
I sprayed the entire dresser (NOT THE PULLS!) with a couple coats of the clear gloss. It was exactly what I wanted- took away that chalky look and feel and made it look more polished. The next step was getting the o'verlays shape on to the drawers.

I basically went to the O'verlays site and searched for the "DeeDee" overlay and then copied and pasted that image into a word document. I then made it the correct size (around 6.125 x 10.125) by just formatting the picture and adjusting the measurements. I then printed out that image and CAREFULLY cut out the shape (making sure to leave the links in the middle so that it stayed together). A picture of my used stencil is above.

To fill in the stencil on my dresser, I used my Krylon gold leafing pen. Again, this was from Michael's. I laid the stencil on the bottom drawer and really just eyeballed it with the hole for where the knob was going. I didn't even tape my stencil down - I realized as long as you keep a steady grip on it as you are tracing the lines, it won't go anywhere.

After I finished the first two stencils, I was so excited I had to stop and admire my work for a second and take a photo. I then stayed up way past my bedtime on a weeknight and decided to knock all of the stenciling out because I was so excited to see the end result. I put all my knobs on. I screwed them in and also superglued them down to the drawer itself, because the screws were a little bit too long and they were wobbly if I didn't. I am sure you could get shorter screws at Home Depot, but who the heck wants to go out and do that at midnight on a random Thursday? Not me :)
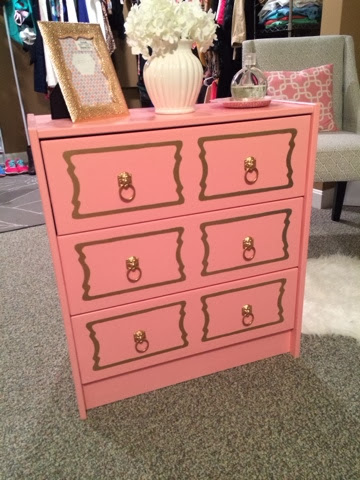
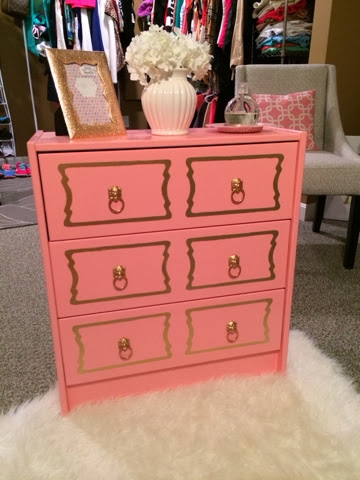
Anyway, below is the final result. I quickly set a few things on top just to mock style it because it was so darn cute and I wanted to take some pictures of it for the blog. I am not sure of where it's real home is going to be and what exactly will be sitting on top of it, but I can tell you - it's going to be pretty wherever it ends up!


Thank you guys for reading, and I hope this was helpful! Please share your link or picture if you do end up trying this out - I love seeing that I have inspired creativity :) Don't forget to share me on Pinterest if you like what you see! Until next time...
Catherine
Chic.Classy.Cheap